Guide
Gulu Ball Guide: Every Ball Type and Capture Rate
Ball types and costs, capture-rate factors, back strikes, level limits and when to spend a King Ball.
A Gulu Ball is only half the catch. The ball sets your floor; the throw sets your ceiling. Weakening the target, stunning it with Star Magic and starting the battle from behind can matter more than upgrading from an Advanced Ball to a specialty ball — and none of those steps costs Shells.
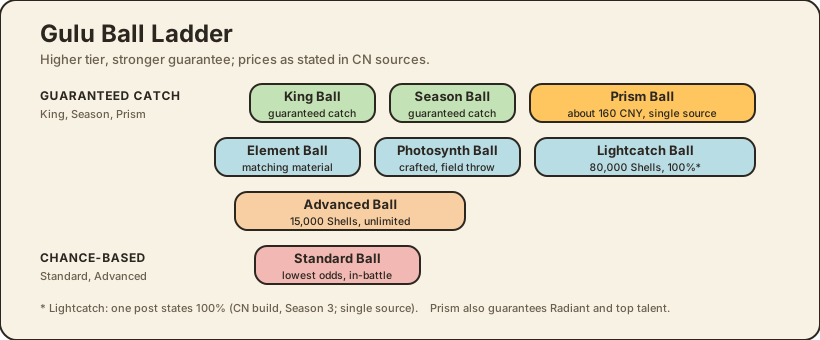
Every ball type at a glance
Prices are the ones stated in the Chinese sources and apply to the CN build.
| Ball | Cost or source | Capture behaviour | Best use |
|---|---|---|---|
| Standard Gulu Ball | Basic stock and crafting | In-battle only; lowest odds | Codex filler you can afford to lose |
| Advanced Gulu Ball | 15,000 Shells, unlimited; Open-air Challenge; merchant | Solid odds; can be thrown in the field | Your default ball for most catches |
| Element Ball | Standard Ball plus matching material | Better against the matching element; hand-holding ignores the element requirement | Farming one type, especially in co-op |
| Photosynth Ball | Crafted from the most common materials | Counts as a field-throw advanced ball | Bulk throwing during Shiny chains |
| Lightcatch Ball | 80,000 Shells; map shops | Guaranteed capture | One-off rares and high-level targets |
| King Ball | Coin Machine, sign-in, merchant | Guaranteed capture and top talent grade; does not raise IVs | Legendaries, hard high-level catches, breeding stock |
| Season Ball | Season rewards and shops | Guaranteed capture, no top-talent guarantee | A budget King Ball |
| Prism Ball | Prism Shards, or about 160 CNY each (single source) | Guaranteed Radiant and top talent, with three stats at 10 | Shinies, perfect eggs, legendaries, favourites |
| Season Radiant Ball | Paid only | Guaranteed seasonal Radiant and top talent | Collection, not general catching |
A Season Ball is the weaker guaranteed ball; a Season Radiant Ball is a paid reward. Neither is a Prism Ball.
What actually moves the capture rate
No source publishes a capture formula. The levers below are what the posts agree on:
- Lower HP first. Catch odds rise sharply once the target is in the red. This is the single cheapest improvement and it applies to every ball tier (CN build, Season 3).
- Stun with a charged Star Magic hit. Charge the spell, land it, then start the battle while the Jini is still stunned. Posts describe the effect as a large increase, not a fixed number (CN build, Season 3).
- Take the back strike. Starting the fight from behind the target adds another bonus on top of the stun. The two stack, which is why the standard routine is stun, walk around, engage (CN build, Season 3).
- Hold a friend's hand. Co-op catching raises the odds for both players, and an Element Ball thrown while linked ignores the element restriction (CN build, Season 3; single source).
- Match the ball to the target. An Element Ball is better than an Advanced Ball against its own type; posts disagree on how much better, with one calling it a slight edge and another saying it beats Advanced outright (CN build, Season 3; single source).
The only hard numbers in the corpus are guarantees, not rates: a King Ball, a Prism Ball and a Season Ball always catch, and one post states that a Lightcatch Ball is 100% (CN build, Season 3; single source). Treat every "X% catch rate" claim elsewhere as invented.
The level rule is obedience, not a capture gate
You can attempt a catch on any Jini you can reach. What level changes is whether the Jini will listen afterwards: if it is more than 10 levels above your player level, it disobeys in battle, may refuse commands and can leave the field (CN build, Season 3). That is an obedience rule, not a capture restriction: level changes what will fight for you, not what you are allowed to throw at.
In practice, an over-levelled catch is still worth making for the Codex entry, a mount or breeding stock. It just will not carry your team until your character level catches up.
King Balls: spend or stockpile?
Saving every King Ball is the more common mistake. Supply is limited but not mythical: King's Castle holds 4 in a Coin Machine drawer, sign-in rewards hand out more, and the Traveling Merchant sometimes stocks them (CN build, Season 3; single source for the drawer count). Hoarding them past the point where you need a guaranteed catch just slows you down.
Spend them where the guarantee removes a real risk: legendaries, high-level targets that eat Advanced Balls, and wild Radiant Jinies whose IVs you plan to keep. Do not spend one on a common Jini you will release, and do not expect it to fix IVs. A King Ball guarantees the top talent grade and the catch, but it does not push individual values to 10 (CN build, Season 3; single source). If you want perfect stats, a Prism Ball is the tool, and even then the usual advice is to save it for a Shiny or a story egg rather than a random wild catch.
The Season Ball is the honest budget option. It guarantees the catch without the talent grade, so use it on the same hard targets when you are out of King Balls (CN build, Season 3; single source).
What a Prism Ball cannot fix
A Prism Ball settles the appearance and the numbers — Radiant, an Exceptional label, three stats at 10 — but it does not settle the Nature. On a wild target that Nature is already locked before you throw, so a perfect-stat catch can land on a Nature that fights the build, which is the exact problem the ball was bought to solve (CN build; one player's testing).
So the test is not rarity, it is whether you know the Nature before you commit. Three sources pass.
- Season shop eggs. The Nature is fixed, and part of the stock is fixed on a Nature that actually suits the Jini rather than a filler one.
- Dungeon eggs. Nature and the three boosted stats are both fixed, which is why the post treats a backlog of them as the obvious Prism Ball queue.
- Destined Flower Seed. The Nature and the three correct stats are published before you take the reward, so you can judge the roll in advance.
Everything else is a gamble on a hidden Nature. If a ball is burning a hole in the bag, the post's fallback is to spend it only on a fixed egg whose three boosted stats include Speed, on the argument that speed is the stat worth forcing. It presents that as a compromise, not a rule.
Keys finish the roll, not more balls
On a free account the scarce item is the key, not the ball. A Silver Key adds one point to one stat, a Gold Key moves the boosted stat, and a Cracked Mirror removes the negative half of a Nature. Turning the common roll of three 8s into three 10s costs six Silver Keys (CN build; one player's testing).
The post's shortcut is to stop chasing a clean sweep. Catch until the Nature points the right way and at least two of the three boosted stats fit, then spend keys and a mirror to finish. For a Jini whose job starts with moving first, a 8/8/8 roll becomes 8/8/10 for two Silver Keys and that is enough; for a slow bruiser, leave Speed alone and bank the keys.
That is also the honest way to price a King Ball. It guarantees the Exceptional label, but the values under that label start at 7 and are often three 7s, so finishing one costs nine Silver Keys rather than six (CN build; one player's testing). Since roughly five or six catches produce an Exceptional roll anyway, a King Ball buys time on a target you cannot farm rather than a way around the key grind. Spend it on the hard-to-catch PvP Jini and stop counting it as a saving.
Buying, crafting and daily limits
Advanced Balls are the one ball you can treat as unlimited. They cost 15,000 Shells with no purchase cap, and one post describes farming enough materials and Shells to throw 1,000-plus in a day (CN build, Season 3; single source). That is the number to plan around: ball supply is a Shells problem, not a stock problem.
Crafting changed in the 16 April update. The old recipe used one ore, one Standard Ball and two flowers; the current one uses one flower and one ore with no Shells cost (CN build, Season 3; single source). Since flowers and ore both respawn on the map twice a day, a route with Share-trait Jinies covers most of your Element and Photosynth Ball needs.
The Traveling Merchant is the other half of the loop. Stock refreshes roughly every four hours according to one post, and the useful purchases are ore, Element Balls and the occasional King Ball; buy what you will use rather than what looks rare (CN build, Season 3; single source). No source gives a numeric daily purchase cap for King Balls, Lightcatch Balls or Prism Balls — those are limited by stock, events and Shards, not by a counter.
For a Shiny hunt, expect to spend hundreds to thousands of balls; the collection logs in the corpus run from a few hundred to over 3,000 per target (CN build, Season 3; single source). The Shiny guide covers the pity system; this page covers what you throw.
A practical throw order
- Standard Balls for Codex entries you do not intend to keep, after weakening the target.
- Advanced Balls for everything else, thrown from the field so you skip the battle animation.
- Element Balls when you are farming one type, especially while linked with a friend.
- Photosynth Balls as your bulk Shiny ball; they are the cheapest high-tier throw you can sustain.
- Lightcatch or Season Balls for a single stubborn high-level target you do not want to lose.
- King Balls for legendaries, breeding stock and any catch where the talent grade matters.
- Prism Balls last, and only on a Shiny, a perfect egg, a legendary or a favourite.
If you are still early, the beginner guide explains which of these you can even buy yet, and the currency guide shows how to pay for the habit. The daily routine turns the merchant and material loops into a repeatable checklist.